
Imagine a sweet treat that will wow your friends and family. It’s a classic American dessert that’s both rich and impressive.
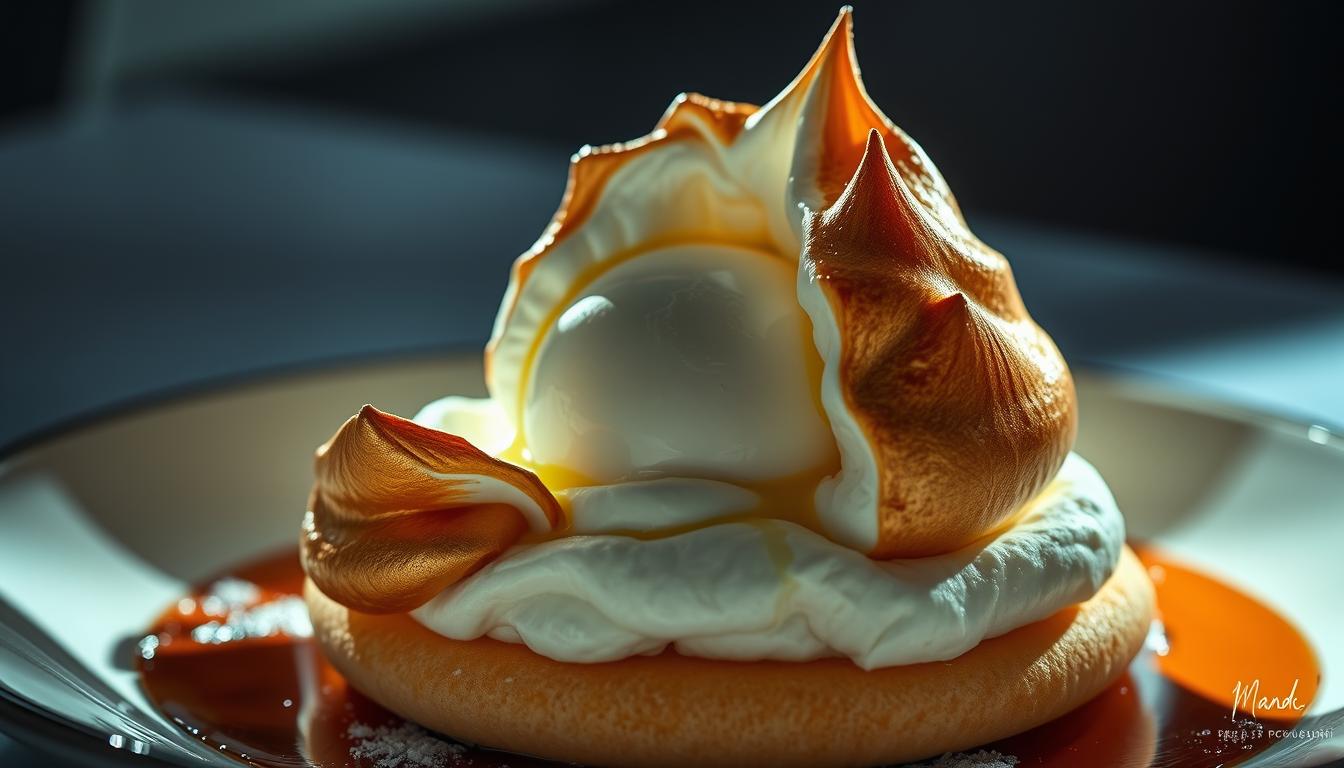
Baked Alaska is a timeless recipe for special occasions. It combines rich ice cream, moist cake, and caramelized meringue. It’s a dessert that will satisfy any sweet tooth.
Making this recipe takes about 10 hours and 35 minutes. But the result is worth it, serving 16 people.
Table of Contents
The History and Allure of Baked Alaska
Baked Alaska has a rich history and a stunning look that draws in dessert fans worldwide. This iconic treat has been a highlight of fine dining for over a century. Its lasting appeal comes from its interesting beginnings and its role as a culinary masterpiece.
Origins of this Iconic Dessert
The story of Baked Alaska is as complex as the dessert itself. It’s thought to have been made in the 1860s by Charles Ranhofer, a French chef at Delmonico’s Restaurant in New York City. Initially called “Alaska, Florida,” it was later renamed Baked Alaska. This name highlights the contrast between the hot meringue and the cold ice cream.
Why Baked Alaska Remains a Culinary Showstopper
Baked Alaska is loved for its dramatic look and mix of textures. The warm, caramelized meringue topping meets a cold, creamy ice cream center, all on a moist cake base. This mix, along with its eye-catching appearance, makes it a standout in any meal.
Whether you’re a pro chef or a home cook looking for a challenge, Baked Alaska will wow everyone. Its special mix of flavors and temperatures, along with its deep history, makes it a timeless dessert classic.
Understanding the Science Behind Baked Alaska
The science of Baked Alaska is all about keeping things cool. It’s amazing how this dessert stays frozen inside, even when it’s baked in a hot oven. This is thanks to some cool physics.
How Ice Cream Stays Frozen While Baking
When baking a Baked Alaska, the ice cream stays frozen. This is because of the quick baking and the meringue layer. The meringue acts like a shield, protecting the ice cream from the oven’s heat.
The Insulating Properties of Meringue
Meringue is key to keeping the ice cream cold. It’s made from egg whites and sugar, which don’t conduct heat well. The air pockets in the meringue also help keep things cool.
| Component | Function |
|---|---|
| Ice Cream | Frozen dessert core |
| Meringue | Insulating layer protecting the ice cream |
| Cake Base | Structural foundation |
Learning about Baked Alaska’s science shows the skill behind it. It’s a mix of a frozen core, meringue insulation, and a solid cake base. This makes Baked Alaska a true wonder of the culinary world.
Essential Ingredients for the Perfect Baked Alaska
The key to a great Baked Alaska is its ingredients. You need a cake base, ice cream, and meringue. Each part is crucial for a show-stopping dessert.
Cake Base Options
Your cake base is the start of your Baked Alaska. You can pick from a sponge cake, a brownie, or a cookie base. Choose one that goes well with your ice cream and holds up well.
Selecting the Right Ice Cream
The ice cream is the heart of your Baked Alaska. You can pick from many flavors, like vanilla, chocolate, matcha, or strawberry. Use high-quality ice cream, store-bought or homemade.
Meringue Ingredients and Alternatives
The meringue topping is what makes Baked Alaska special. It’s made with egg whites and sugar. For dietary needs, you can use aquafaba or sugar substitutes. The goal is to get stiff, glossy peaks.
| Ingredient | Traditional Option | Alternative Option |
|---|---|---|
| Cake Base | Sponge Cake | Brownie or Cookie |
| Ice Cream | Vanilla or Chocolate | Matcha or Strawberry |
| Meringue | Egg Whites and Sugar | Aquafaba or Sugar Substitutes |
By picking the right ingredients and thinking about dietary needs, you can make a Baked Alaska that’s tasty and beautiful.
Required Equipment and Tools
Before you start making your Baked Alaska, it’s essential to gather the necessary tools and equipment. Having the right tools will make the process smoother and help you achieve a professional-looking dessert.
Essential Baking Equipment
To make a Baked Alaska, you’ll need some basic baking equipment. This includes a mixing bowl, a baking sheet, and an oven. A mixing bowl is necessary for whipping cream and beating eggs. A baking sheet is required for baking the cake base. Your oven will be used for baking the cake and potentially for browning the meringue.
Optional Specialized Tools
While not necessary, some specialized tools can make the process easier. A blowtorch is useful for caramelizing the meringue, giving it a golden-brown color. You may also consider using an ice cream scoop to create uniform ice cream balls.
Preparing the Cake Base
Creating the perfect cake base is key for a great Baked Alaska. The cake base is the foundation, adding texture and flavor to the dessert. It contrasts well with the ice cream and meringue layers.
Classic Sponge Cake Recipe
A sponge cake is a top pick for Baked Alaska. It’s light and has a neutral taste. To make it, separate eggs, whip the whites until stiff, and fold them into a mix of egg yolks, sugar, and flour. This keeps the cake moist and holds its shape with the ice cream.
Alternative Cake Base Options
While a classic sponge cake is a favorite, you can try other bases for a unique twist. This adds new flavors to your Baked Alaska.
Brownie Base Variation
A brownie base brings a deep, chocolatey taste. Make a dense, fudgy brownie mix, bake it thin, and cool it before adding ice cream.
Cookie Base Variation
A cookie base is another exciting option. Use a thick cookie dough, bake it thin, and use it as the base. It adds a crunchy texture that’s great with smooth ice cream.
| Cake Base Type | Flavor Profile | Texture |
|---|---|---|
| Sponge Cake | Neutral, slightly sweet | Light, airy |
| Brownie | Rich, chocolatey | Dense, fudgy |
| Cookie | Varies by cookie type | Crunchy |
Creating the Ice Cream Layer
Making the perfect ice cream layer is key for a great Baked Alaska. This layer adds a cool contrast to the hot meringue, making it a hit at parties.
Traditional Ice Cream Flavors for Baked Alaska
Classic flavors like vanilla, chocolate, and coffee are perfect for Baked Alaska. They offer a timeless taste that goes well with the meringue and cake. But, feel free to try unique flavors to make it your own.
“The key to a great Baked Alaska is not just the flavor, but the texture of the ice cream,” says pastry chef Jacques Torres. “You want it to be smooth and creamy, so it holds up well to the meringue and baking.”
Molding and Freezing Techniques
To get a uniform ice cream layer, mold it right. Use a dome-shaped mold or a bowl. Freeze it until firm, which takes about 2 hours. This step is key for your Baked Alaska’s structure.
Working with Multiple Ice Cream Flavors
Using different ice cream flavors can make your Baked Alaska more interesting. Layer different flavors in your mold for a marbled look. Freeze each layer before adding the next to keep them separate.

By following these steps, you can make a beautiful and tasty ice cream layer for your Baked Alaska. Remember, the ice cream needs to be firm and well-structured to handle the meringue’s heat.
Mastering the Perfect Meringue
To make a stunning Baked Alaska, you need to perfect the meringue topping. It looks great and keeps the ice cream cold. This is key.
There are two main ways to make meringue: French and Italian. Knowing the difference helps you get the right texture and stability for your Baked Alaska.
French vs. Italian Meringue Methods
The French method whips egg whites and sugar until stiff. It’s simpler but might not hold up well in heat.
The Italian method slowly adds hot sugar syrup to egg whites. This makes a stronger, glossier meringue. It’s better for Baked Alaska because it can handle oven heat.
Achieving Stiff, Glossy Peaks
Getting stiff, glossy peaks is key for a great meringue. Start by whipping egg whites until frothy. Then, add sugar slowly while whipping.
For perfect peaks, use room temperature egg whites. Add cream of tartar for stability. Don’t over-whip to avoid a grainy texture.
Troubleshooting Common Meringue Problems
Common meringue issues are weeping and browning too fast. To fix these, use room temperature egg whites. The Italian method is also better for stability.
| Issue | Cause | Solution |
|---|---|---|
| Weeping | Cold egg whites | Use room temperature egg whites |
| Browning too quickly | High oven temperature | Reduce oven temperature |
Mastering the meringue is crucial for a delicious and beautiful Baked Alaska. Whether you choose French or Italian, focus on stiff, glossy peaks. They must withstand oven heat.
Assembling Your Baked Alaska
To make a stunning Baked Alaska, you must learn how to assemble it. This means layering the cake, ice cream, and meringue carefully. You want it to look good and hold together well.
Layering Techniques
The key to a great Baked Alaska is its layers. Start with a sturdy cake base. Then, add a generous scoop of ice cream. Make sure the ice cream is evenly spread and a bit domed to support the meringue.
Choose the right moment to add the meringue. When the ice cream is firm and the cake is in place, it’s time. Spread the meringue evenly, sealing the edges to keep the ice cream from melting.
Creating the Perfect Dome Shape
To get a smooth, dome-shaped Baked Alaska, you need some skill. Use an offset spatula to spread the meringue evenly. Start at the bottom and work your way up, rotating the dessert to keep it symmetrical.
Decorative Meringue Application Methods
The meringue topping is not just for function; it’s also for style. You can use a piping bag for fancy designs or just swirl it for a simple look. For a bold touch, lightly brown the meringue peaks with a kitchen torch.
By mastering these assembly techniques, you’ll be well on your way to creating a Baked Alaska that will wow your guests.
Baking and Flambéing Your Baked Alaska
The moment of truth for your Baked Alaska is when you decide to bake or flambé. This step is crucial for the dessert’s presentation. You can use your oven for even heat or a blowtorch for dramatic flair. The goal is to get a perfectly toasted meringue.
Oven Baking Method
Baking your Baked Alaska in the oven is simple but requires precision. Preheat your oven to 500°F (260°C). Place your Baked Alaska on a baking sheet and bake for 3-5 minutes. The meringue should turn golden brown. Watch it closely to avoid burning.
Blowtorch Technique
Using a kitchen blowtorch for toasting the meringue adds drama. This method lets you control the browning. Hold the flame 6 inches away and move it slowly. The meringue should turn golden brown. Be careful not to burn the meringue or melt the ice cream.
Safe Flambéing with Alcohol
Flambéing your Baked Alaska adds drama. To do it safely, choose the right spirits and follow safety steps.
Selecting the Right Spirits
Choose a high-proof alcohol that matches your Baked Alaska’s flavors. Dark rum, Grand Marnier, or Cognac are good choices. Warm the alcohol slightly before igniting.
Safety Precautions
When flambéing, make sure you’re in a safe area. Keep a fire extinguisher nearby and clear your workspace of flammable materials. Light the alcohol carefully and gently tilt the Baked Alaska to let the flames dance.
| Method | Temperature | Time |
|---|---|---|
| Oven Baking | 500°F (260°C) | 3-5 minutes |
| Blowtorch | N/A | Until golden brown |
| Flambéing | Warm alcohol | Until flames extinguish |

By following these methods and safety guidelines, you’ll create a stunning Baked Alaska. Whether baking or flambéing, your dessert will impress. It’s perfect for any special occasion.
Stunning Baked Alaska Variations
Baked Alaska is a canvas for creativity. You can mix and match elements to craft a dessert that’s uniquely yours.
Mini Individual Baked Alaskas
Mini Baked Alaskas are great for parties or special events. They’re cute and let everyone have their own treat. Just use smaller molds and adjust the ingredients.
- Use small ramekins or molds to shape your Baked Alaska.
- Adjust the baking time accordingly, as mini versions will bake faster.
- Consider decorating each mini Baked Alaska differently for a personalized touch.
Chocolate-Covered Baked Alaska
Chocolate lovers will adore a chocolate-covered Baked Alaska. It brings a creamy texture that pairs well with the ice cream and meringue.
To do this, melt high-quality chocolate and pour it over your Baked Alaska before freezing. It boosts the flavor and looks amazing.
Seasonal Flavor Combinations
Adding seasonal flavors keeps your Baked Alaska fresh all year. Try pumpkin ice cream in fall or peppermint in winter.
Some seasonal combinations to try:
- Summer: Strawberry ice cream with fresh berries.
- Fall: Pumpkin ice cream with caramel sauce.
- Winter: Peppermint ice cream with crushed candy canes.
- Spring: Lemon ice cream with lemon curd.
Exploring these variations keeps your Baked Alaska exciting for any time of year or occasion.
Presentation and Serving Suggestions
To make a lasting impression, focus on the presentation and serving of your Baked Alaska. The way you present this dessert can elevate the overall dining experience.
Elegant Plating Techniques
When plating your Baked Alaska, use a decorative plate or a pedestal for height and visual appeal. You can also garnish with fresh fruits or edible flowers to add a pop of color.
Complementary Sauces and Garnishes
Enhance your Baked Alaska with complementary sauces such as caramel or chocolate. Fresh berries or whipped cream can also be used as garnishes to add texture and flavor contrast.
Timing the Perfect Tableside Presentation
For a dramatic effect, consider presenting your Baked Alaska tableside. Timing is crucial; make sure to have the dessert ready to be served just as you’re about to present it. This will ensure that the meringue remains crispy and the ice cream stays frozen.
By paying attention to these details, you can create a memorable dining experience for your guests.
Conclusion: Enjoying Your Homemade Baked Alaska Masterpiece
Now that you’ve made your Baked Alaska, it’s time to enjoy it. This dessert will wow your family and friends. With these tips, you’ll make every bite special.
When you serve your Baked Alaska, add some extra touches. Try a drizzle of caramel or chocolate sauce. A sprinkle of edible gold dust or fresh berries can make it even better. Slice it carefully to keep its layers intact and look great.
Enjoying your Baked Alaska is all about the taste and look. The mix of textures and flavors will amaze you and your guests. It’s a dessert that will leave a lasting memory.
Have you ever tried this recipe?
There are no reviews yet. Be the first one to write one.